Concept Analyzer - Included with the Professional Document Analyzer
Documentation
- Created: June 7, 2018
- by: Atebion LLC
- Email: Sales@AtebionLLC.com
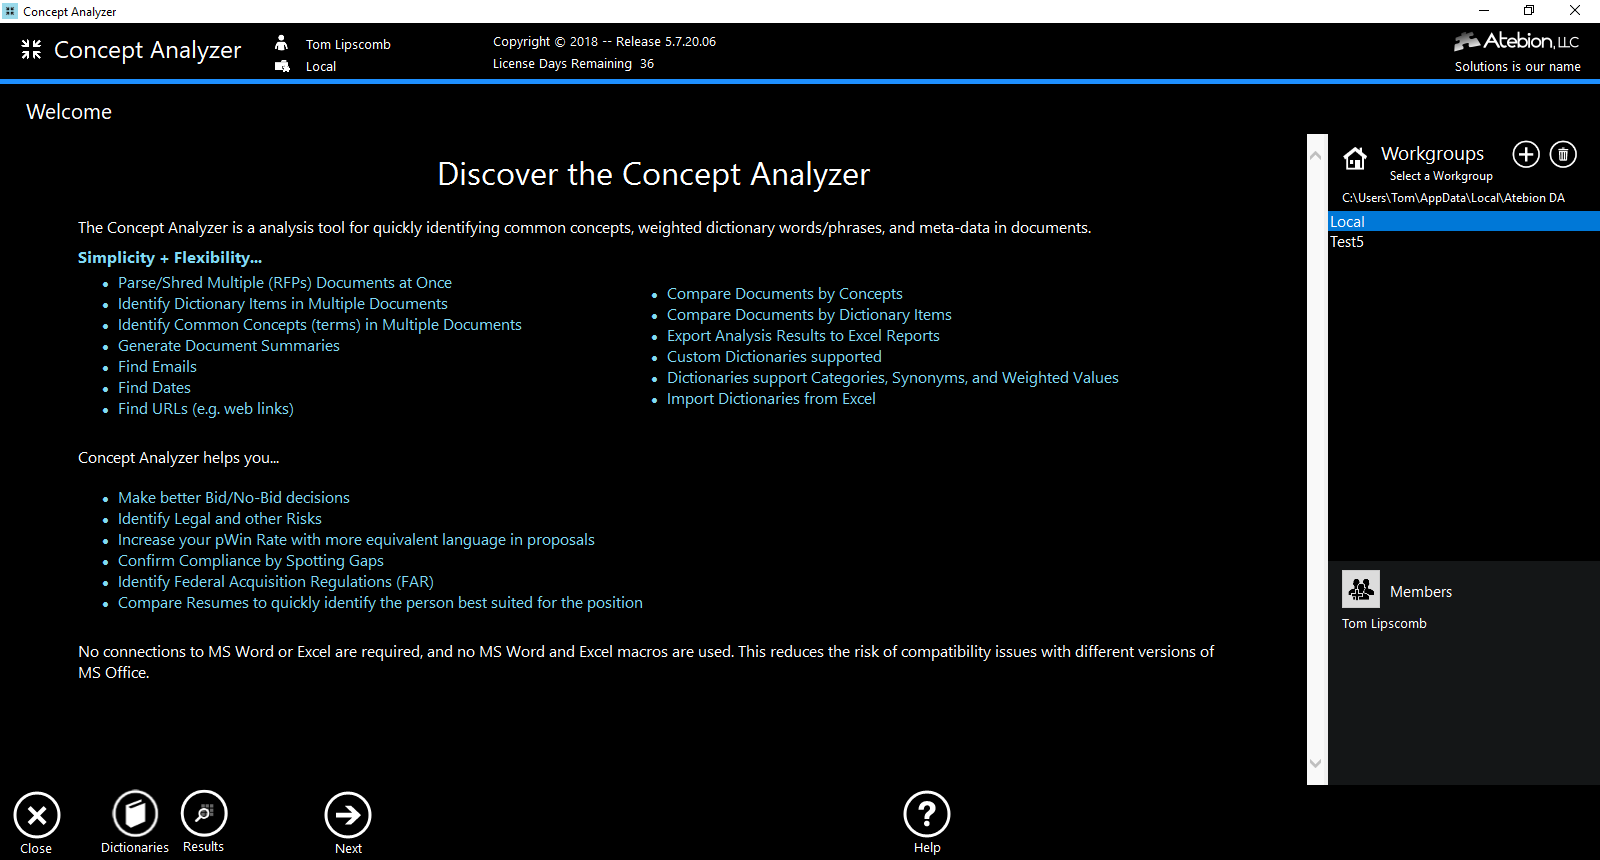
Welcome! Analyze Documents to quickly know their content and content differences between documents.
In the following sections we will explain how to use the Concept Analyzer in the easiest way possible. If you have any questions that you think should have been in this document, please contact us and we'll get back to you as soon as possible. Thanks for your support!
Concept Analyzer helps you...
- • Make better Bid/No-Bid decisions
- • Identify Legal and other Risks
- • Increase your pWin Rate with more equivalent language in proposals
- • Confirm Compliance by Spotting Gaps
- • Identify Federal Acquisition Regulations (FAR)
- • Compare Resumes to quickly identify the person best suited for the position
Features:
- • Parse/Shred Multiple (RFPs) Documents at Once
- • Identify Dictionary Items/Terms in Multiple Documents
- • Identify Common Concepts (terms) in Multiple Documents
- • Generate Document Summaries
- • Find Emails
- • Find URLs (e.g. web links)
- • Compare Documents by Concepts
- • Compare Documents by Dictionary Items/Terms
- • Export Analysis Results to Excel Reports
- • Custom Dictionaries supported
- • Dictionaries support Categories, Synonyms, and Weighted Values
- • Import Dictionaries from Excel (exported from other software tools)
Workgroups
Share and work together on content, results, templates and artifacts (e.g. Compliance Matrix & Storyboards/Proposal Development Worksheets (PDW))
- You can belong to one or more workgroups
- The 'Local' workgroup is your personal workgroup
- Local workgroup path is C:\Users\<your computer user name>\AppData\Local\Atebion DA
- Workgroups do not require an internet connection
- Non-Local workgroups are located on your company’s network server(s)
- Workgroups can be in a Secure Environments (e.g. SCIF)
Create Workgroup
Steps:
1. Click the (+) New button at the bottom in the Workgroup area and then the Workgroup window will open.
2. Click the 'Create a new Workgroup' button.
3. Select a drive/folder by clicking the 'Browse' button.
4. Enter a unique Workgroup Name and enter a Description.
5. Click the 'Save' button.
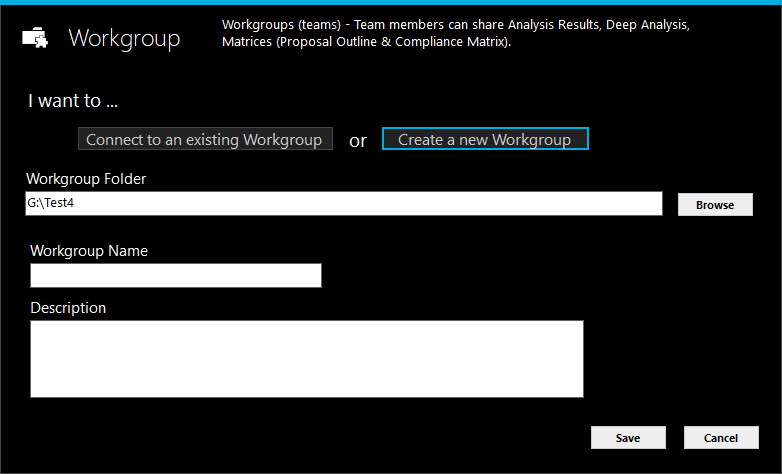
Connect to a Workgroup
Steps:
1. Click the (+) New button at the bottom of the application and a Workgroup window will open.
2. Click the 'Connect to an existing Workgroup' button.
3. Select a Workgroup path by clicking the 'Browse' button.
3. Click the 'Save' button.
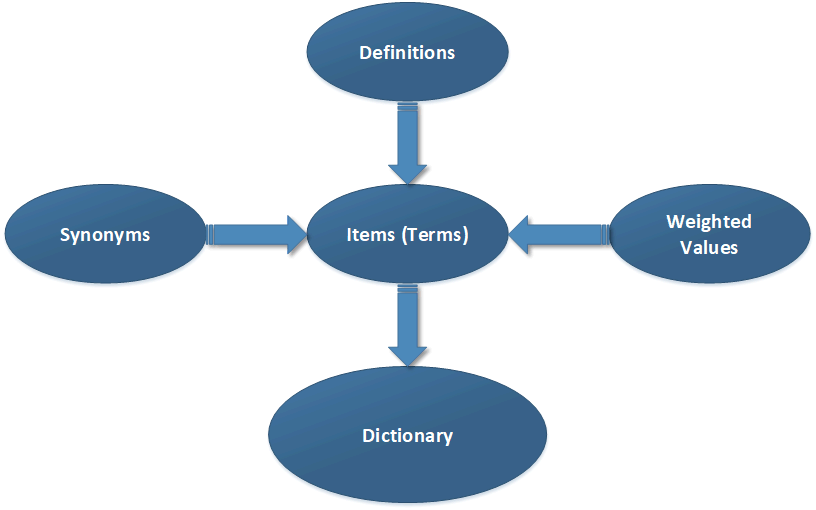
Dictionaries Overview
The diagram below shows the components that defines the Concept Analyzer's Dictionaries.
- Dictionary - A lists of the words and phrases for a branch of knowledge (lexicons) with definitions, synonyms, and weighted values.
- Item/Term - A word or phrase used to describe a thing or to express a concept.
- Definition - A formal statement of the meaning or significance of a word or phrase.
- Synonym - A word or phrase that means exactly or nearly the same as another word or phrase.
- Weighted Value - A given numeric value (0 to 1) for an item/term to define the level of influence according to a criterian.
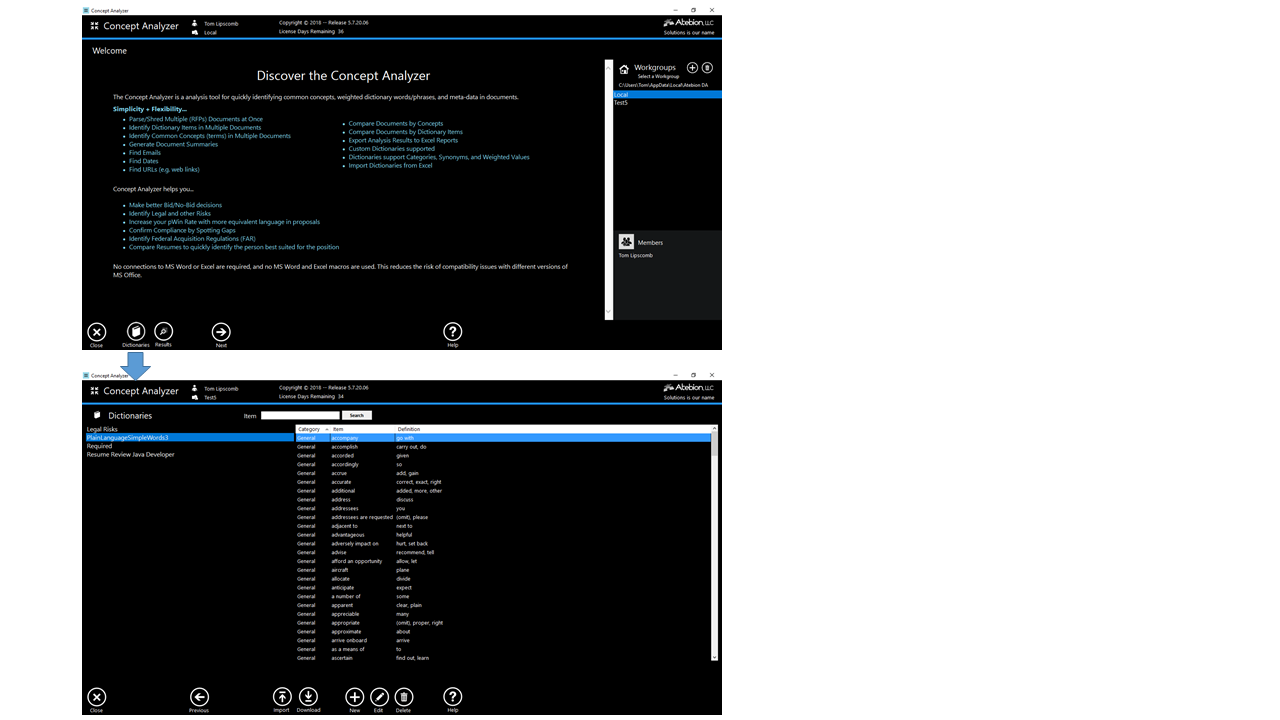
Dictionary panel
The Dictionary panel is where you maintain your dictionaries for a particular Workgroup. To access the Dictionary panel, click on the Dictionaries button located at the bottom left of the Concept Analyzer. The Dictionary panel is shown below.
Download Dictionaries
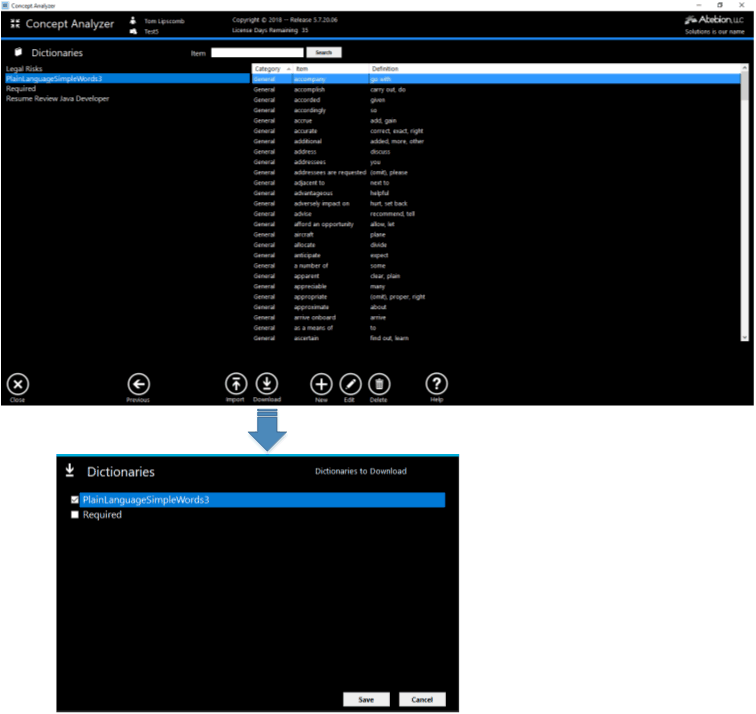
You can create your own dictionary or download dictionaries from Atebion LLC. To download dictionaries, go to the Dictionaries panel and click the Download button at the bottom of the Concept Analyzer. After you click the Download button, a Download window will be displayed. Simply check the dictionaries you want to download to your current Workgroup and click the Save button, as shown below.
Import a Dictionary
Use Case: Import Dictionaries from other software companies.
To create a new dictionary via importing a file, click the Import button at the bottom of the Dictionaries panel, as shown below.
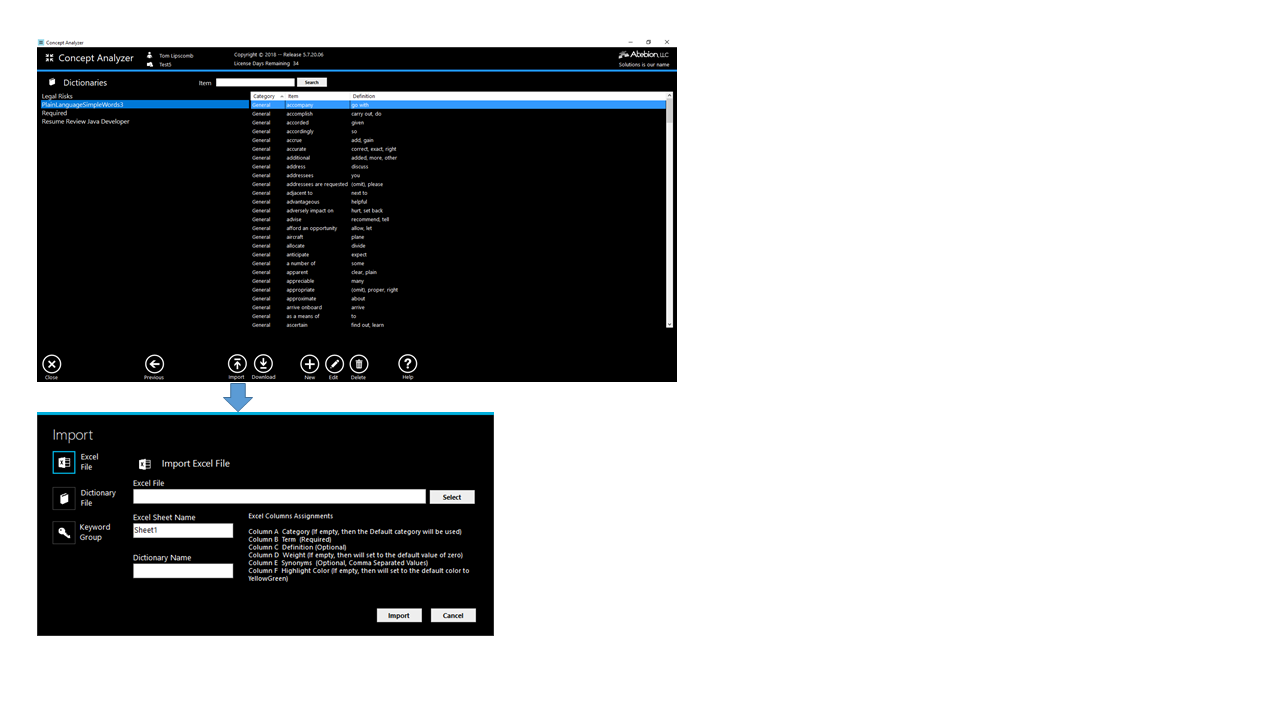
The new dictionary via an import will be created in your current Workgroup.
There are three types of imports supported for creating new dictionaries.
- Excel - Provides the ability to import dictionaries from various sources, such as from other software tools.
- Column A - Category (If empty, then the Default category will be used)
- Column B - Item/Term (Required)
- Column C - Definition (Optional)
- Column D - Weight (If empty, then will set to the default value of zero)
- Column E - Synonyms (Optional, Comma Separated Values)
- Column F - Highlight Color (If empty, then will set to the default color to YellowGreen)
- Dictionary - Import a dictionary file from another Workgroup or from someone who has sent you a Concept Dictionary file (*.dicx).
- Keyword Group - A Professional Document Analyzer Keyword Group can be imported as a new dictionary. The Keyword Groups selection will be from your current Workgroup.
Excel Columns Assignments:
Typically, other software tools save dictionary exports to Comma Separated Values (CSV) files. To import a CSV dictionary into the Concept Analyzer, open the CSV file in Excel and save the CSV file as an Excel file (xlsx) and then import the newly save Excel file.
To maintain your dictionaries external from the Concept Analyzer, simply click on the 'Dictionaries' caption on the Dictionaries panel. This will open Windows Explorer at your current Workgroup Dictionary folder.
Create & Edit a Dictionary
From the Dictionaries panel, click the New button to create a new dictionary and the click the Edit button to change the selected dictionary.
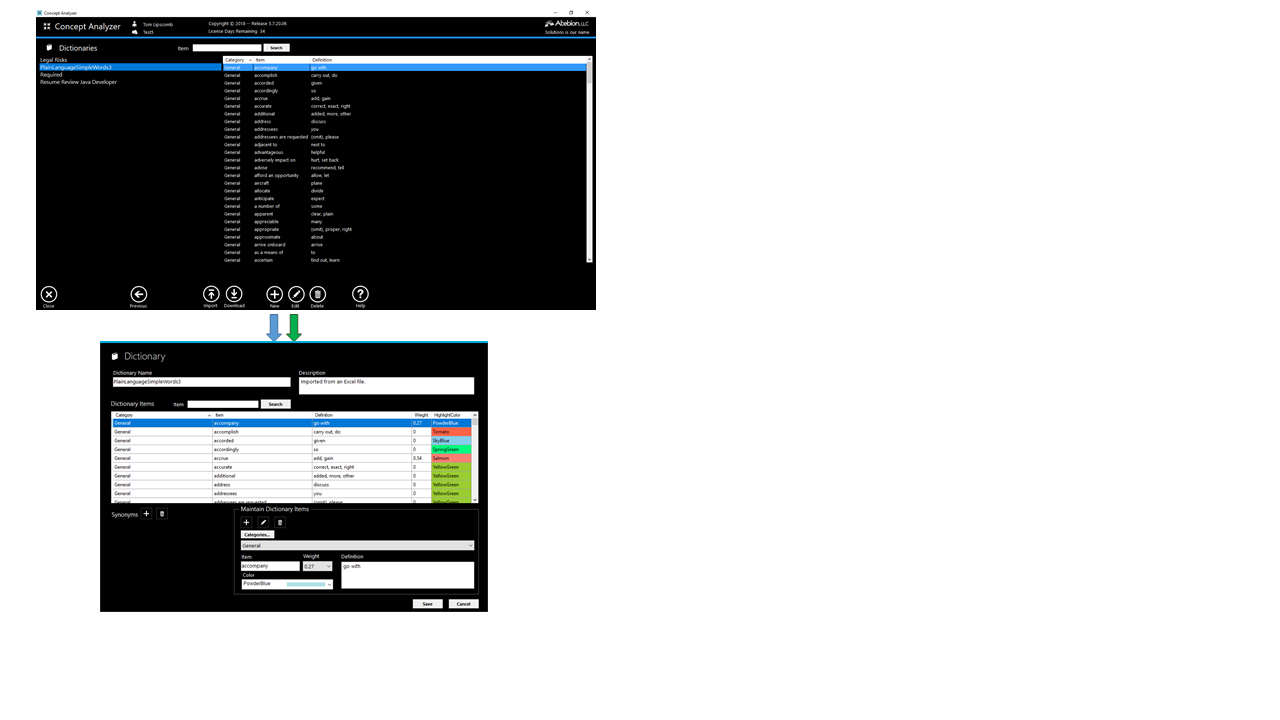
Maintain a Dictionary
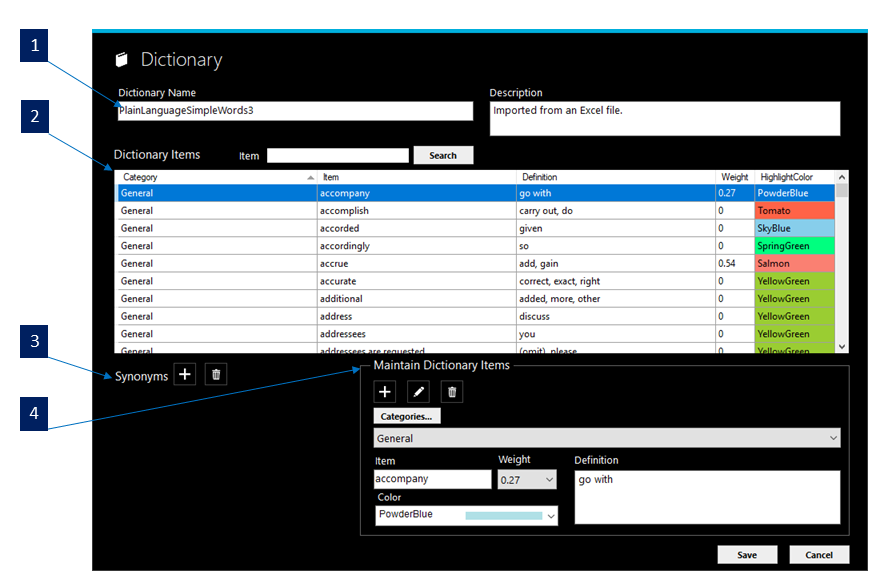
1. Dictionary Name – A Dictionary Name must be unique within a Workgroup.
2. Dictionary Item Table – As you select on a Dictionary item in the table, the selected item is presented in the Maintain Dictionary Item area (#4) for edit.
3. Maintain Synonyms – Next to the Synonyms caption, there are two buttons for maintaining synonyms. Using synonyms is optional.
 The New button opens a window to create a new synonym for the selected dictionary item.
 The Delete button removes the selected synonym.
4. Maintain Dictionary Items – The Maintain Dictionary Items area provides the ability to create, edit and delete dictionary items.
Insert content in the Maintain Dictionary area as a new dictionary item.
 Update the selected dictionary item with your changes.
Remove the selected dictionary item.
 Maintain Categories, e.g. Add, Edit, and Remove. If a category has not been selected, then the default category is General.
Analyze Documents
Click on the Next button from the Welcome panel to go to the Analyze panel.
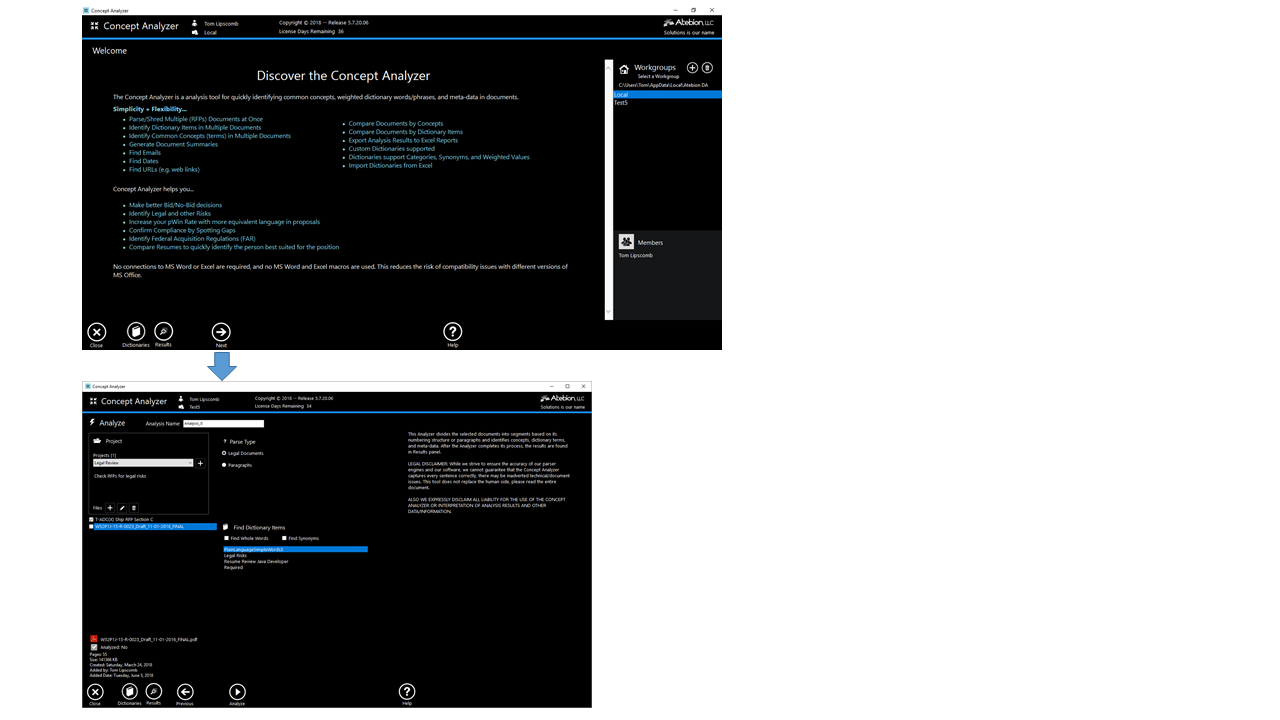
This Analyze panel is where you run the analysis for your selected documents.
The Analyzer will ...
- Parse/Shred Multiple Documents at once. - MS Word and PDF documents map page numbers to parse content
- Identify Dictionary Items/Terms
- Generate Document Summaries
- Identify Common Concepts
- Find Emails
- Find Dates
- Find URLs (e.g. web links)
The Concept Analyzer does not connect to MS Word or Excel, so there are not any compatibility issues with different versions of MS Office. - However, on rare occasions the Concept Analyzer is unable to convert a MS Word document to Plain Text. When this occurs, the Concept Analyzer automatically will connect to MS Word to convert the document.
Analyze panel details:
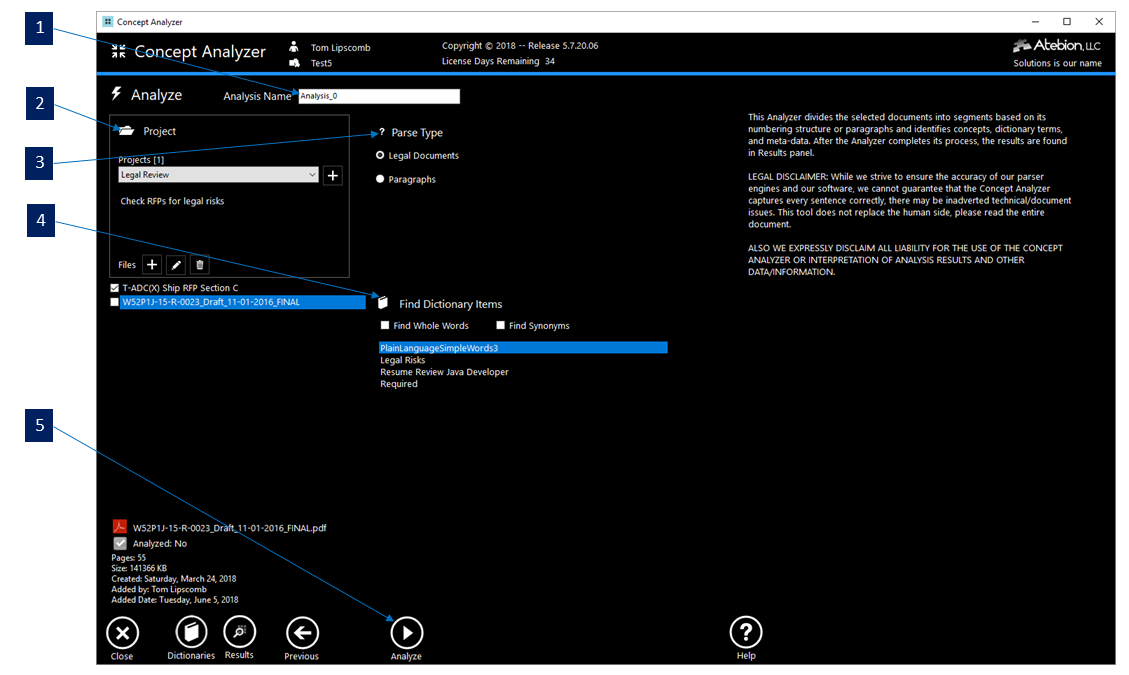
1. Analysis Name – The Analysis Name automatically generates for you, but you can rename it as you wish.
2. Project Area:
The Concept Analyzer’s Projects collection is NOT the same projects as the Professional Document and Matrix Builder.
The New button next to the Project drop-down list is used to create a new project.
The New button next to the Files caption is used to add a file to the selected project.
File Types supported are MS Word files (docx), Excel (xlsx), PowerPoint (pptx), Portable Document Format (PDF), Rich Text Format, and Plain Text.
When a new document is selected, the document is converted to Plain Text and for MS Word and PDF file the pages are mapped to content. If the selected document is large and/or complex, this process might take a few moments.
The Edit button next to the Files caption is used for editing the selected document’s Plain Text. Use this capability to remove unwanted content, such as Table of Contents prior to running the analyzer.
The Delete button next to the Files caption is used to remove the selected document from the selected project.
Once a document has been analyzed, you cannot remove it because there is analysis data associated with it.
3. Parser Types – The Concept Analyzer supports two types of parsers. The Legal parser is for documents that are numbered, such as most Federal RFPs. And the Paragraph parser is for non-numbered documents.
4. Dictionary – A Dictionary must be selected.
5. Analyze – Once you have selected your documents and dictionary, click the Analyze button. After the analysis has completed, the Results panel will be display with your Analysis selected.
Documents for the same Project can have multiple Analysis runs. The Parser does not need to run again for following analysis if you use the same Parser Type. This saves time for various dictionary analysis.
Results Overview
The analysis results in the Results panel is organized within a navigation tree. Associations are shown between Projects, Documents, and Analysis containing Documents selected from its Project.
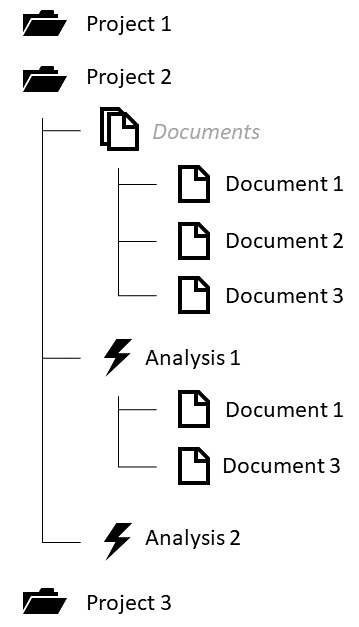
The difference between Analyses is the Documents selected and the selected Dictionary.
After an Analysis or a Document has been selected, a series of result category buttons (e.g. Summary, Concepts and Dictionary) are displayed.
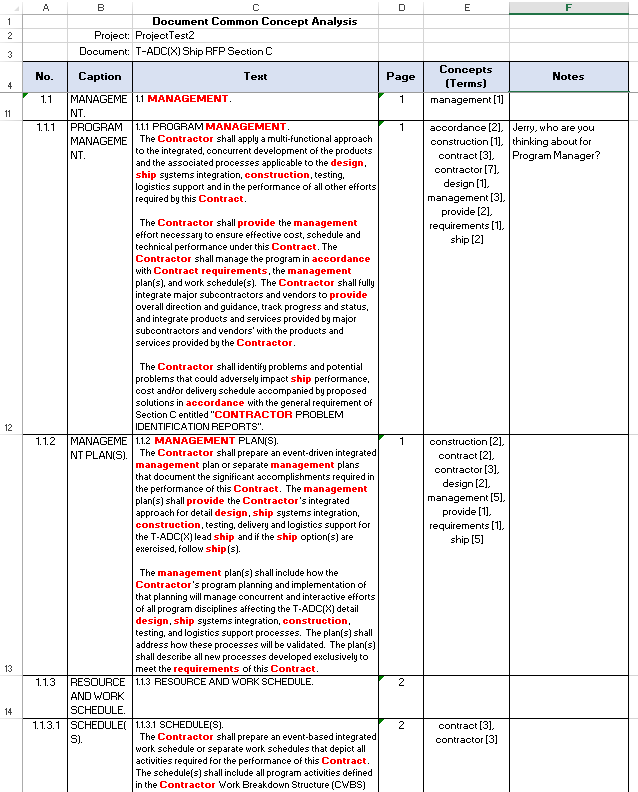
Results Concepts
Common Concepts are derived from a document using Natural-Language Processing (NLP), not from a dictionary.
Use Case: Quickly discover themes in an RFP for a Bid/No-Bid review.
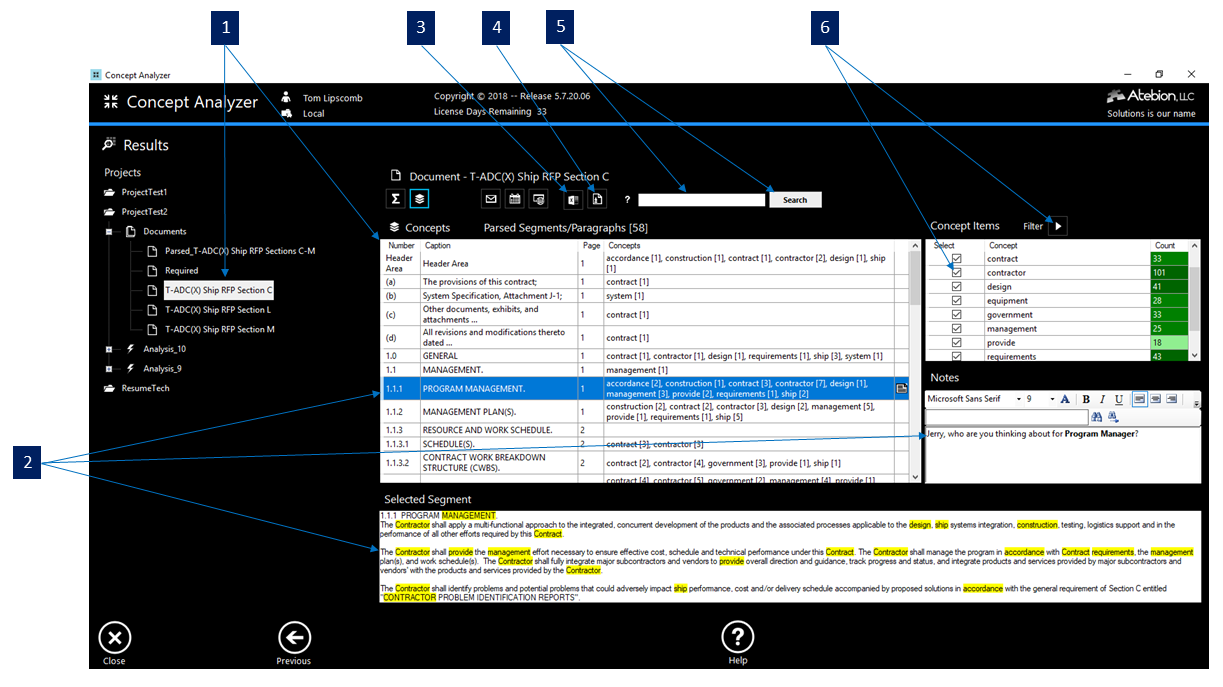
1. Select a Document – In the tree, you can select a Document’s Concept Results either under the Documents or under an Analysis.
2. Segment/Paragraph Selection – A selected table row displays its associated parsed segment/paragraph and any annotated notes you have entered.
Notes are automatically saved.
3. Export Results to Excel – Click the Excel button to export the Concept Results to an Excel file.
Filtered results can be exported via Search (5) and Concept filter (6)
Your Notes are included in the export.
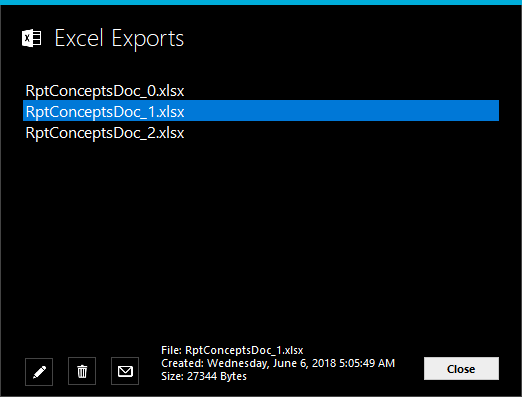
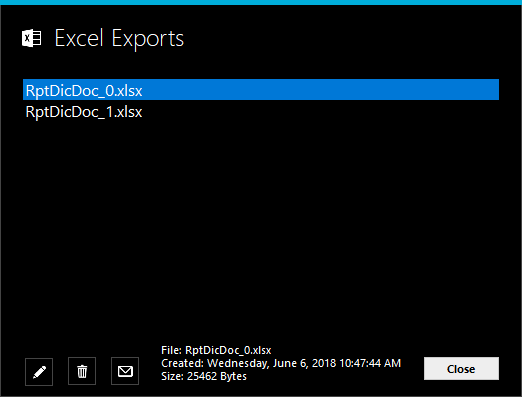
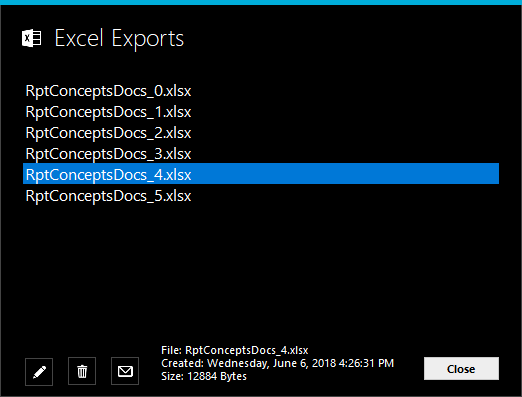
4. Exported Excel Files – Click the Exported button to open a previous exported Excel file or share with co-workers via Email (Outlook required).
5. Search Filter – Filter the results based on words, phrases, and wildcard using logic parameters.
Wildcards:
? = Matches any single character.
* = Matches any one or more characters. For example, bet* matches any text that includes 'bet', such as 'better'.
The AND operator matches content where both terms exist anywhere in the text (e.g. Should AND Require, finds both)
The OR operator is the default conjunction operator.
This means that if there is no Boolean operator between two terms, the OR operator is used. (e.g. Should OR Require, finds either)
The NOT operator excludes content that contain the term after NOT. (e.g. Should Not Require
6. Concept Filter – Check or uncheck Concept desired Items and then click the Filter button.
Results Dictionary
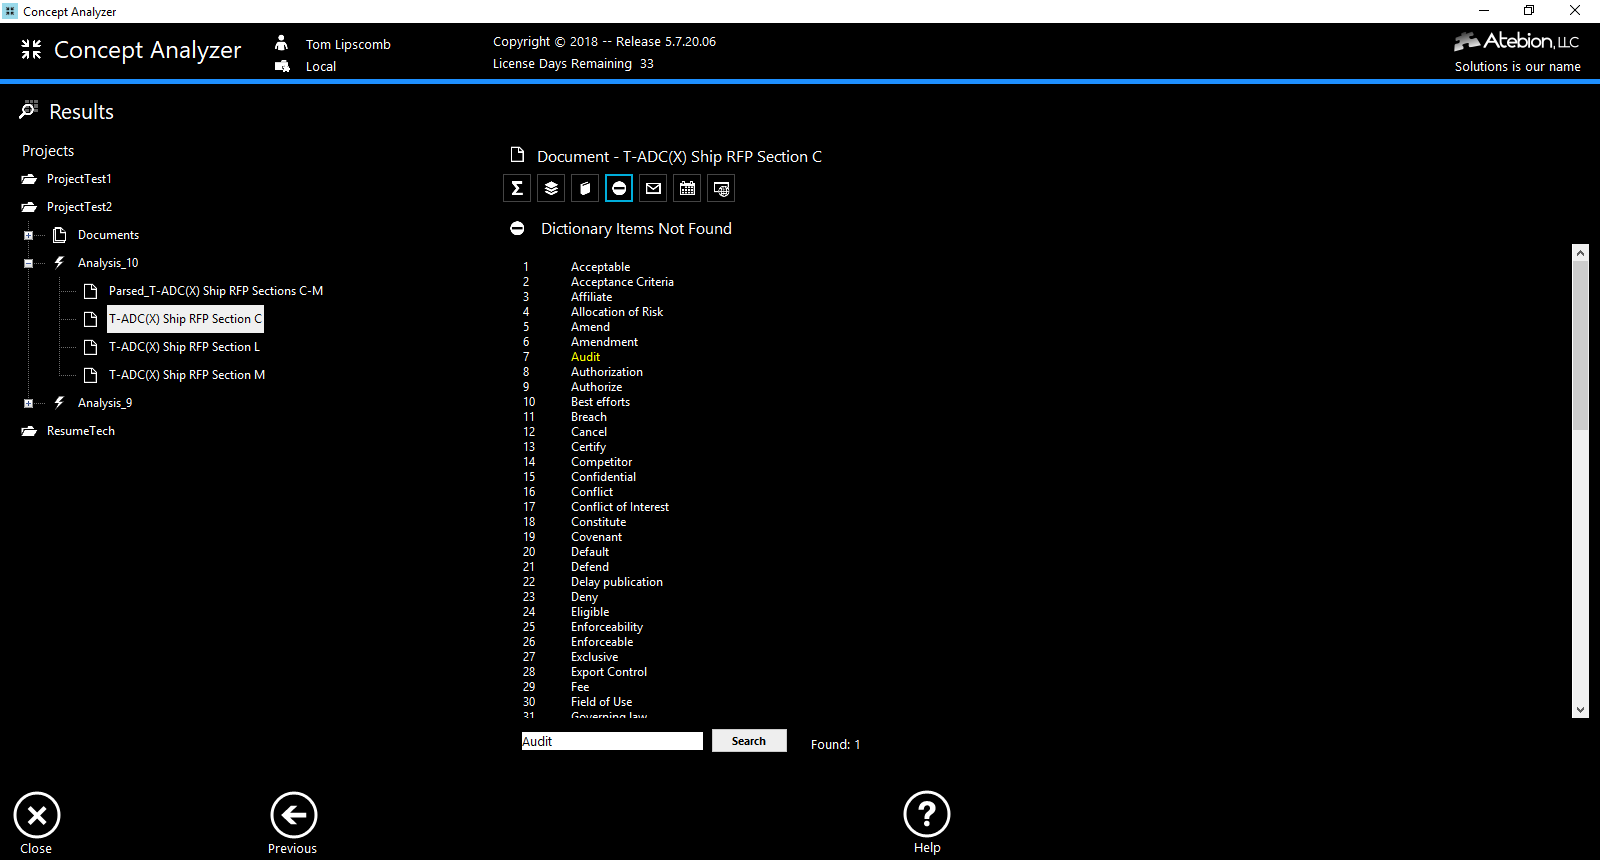
Dictionary Analysis Results for a Document identified Dictionary Items/Terms within parsed segments/paragraphs.
Use Case: Discover Legal Risks in an RFP or Contract.
Use Case: Identify Requirements in an RFP.
Use Case: Identify Federal Acquisition Regulations (FAR)
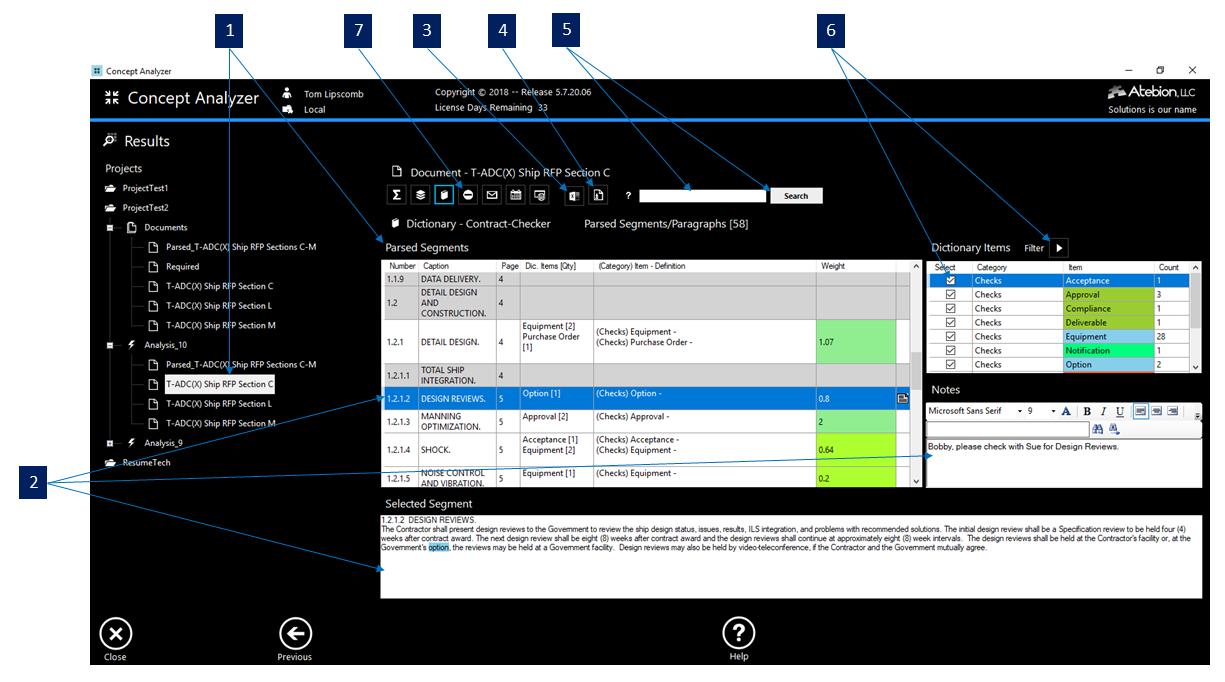
1. Select a Document – In the tree, select a Document’s Dictionary Results under a selected Analysis.
2. Segment/Paragraph Selection – A selected table row displays its associated parsed segment/paragraph and any annotated notes you have entered.
Notes are automatically saved.
3. Export Results to Excel – Click the Excel button to export the Dictionary Results to an Excel file.
Filtered results can be exported via Search (5) and Concept filter (6)
Your Notes are included in the export.
Value Colors are optional, the default is Yes per the Color checkbox on the Export window.
4. Exported Excel Files – Click the Exported button to open a previous exported Excel file or share with co-workers via Email (Outlook required).
5. Search Filter – Filter the results based on words, phrases, and wildcard using logic parameters.
Wildcards:
? = Matches any single character.
* = Matches any one or more characters. For example, bet* matches any text that includes 'bet', such as 'better'.
The AND operator matches content where both terms exist anywhere in the text (e.g. Should AND Require, finds both)
The OR operator is the default conjunction operator.
This means that if there is no Boolean operator between two terms, the OR operator is used. (e.g. Should OR Require, finds either)
The NOT operator excludes content that contain the term after NOT. (e.g. Should Not Require
6. Dictionary Items Filter – Check of uncheck Concept desired Items and then the Filter button.
7. Not Found Dictionary Items – A listing of dictionary items/terms not found in the document.
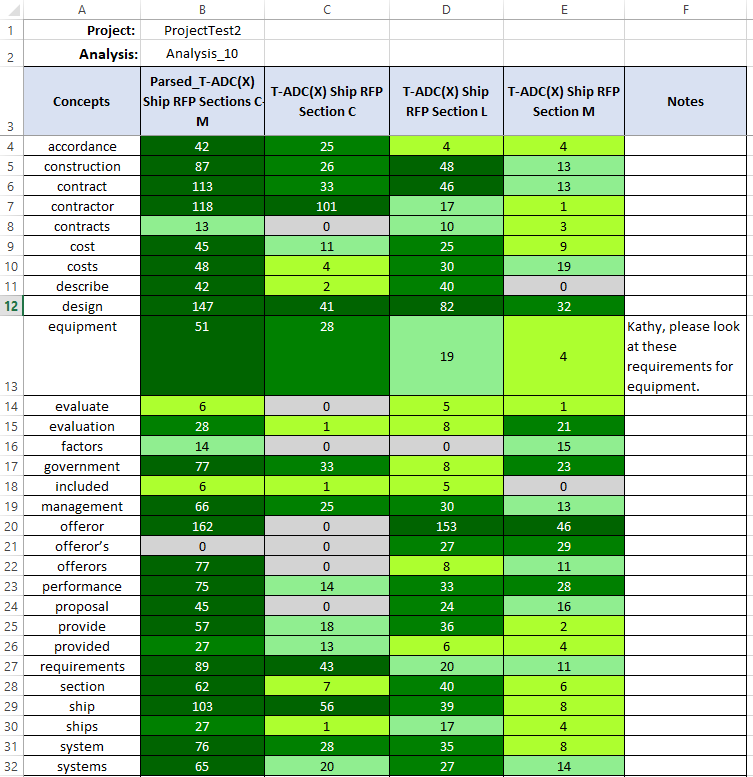
Results Documents Concept Comparisons
Use Case: Gap Analysis between an RFP and Proposal
Results Documents Concept Comparisons is a concept matrix of counts for each document.
Counts are color coded by value range, providing visual assistance for recognizing higher and lower counts.
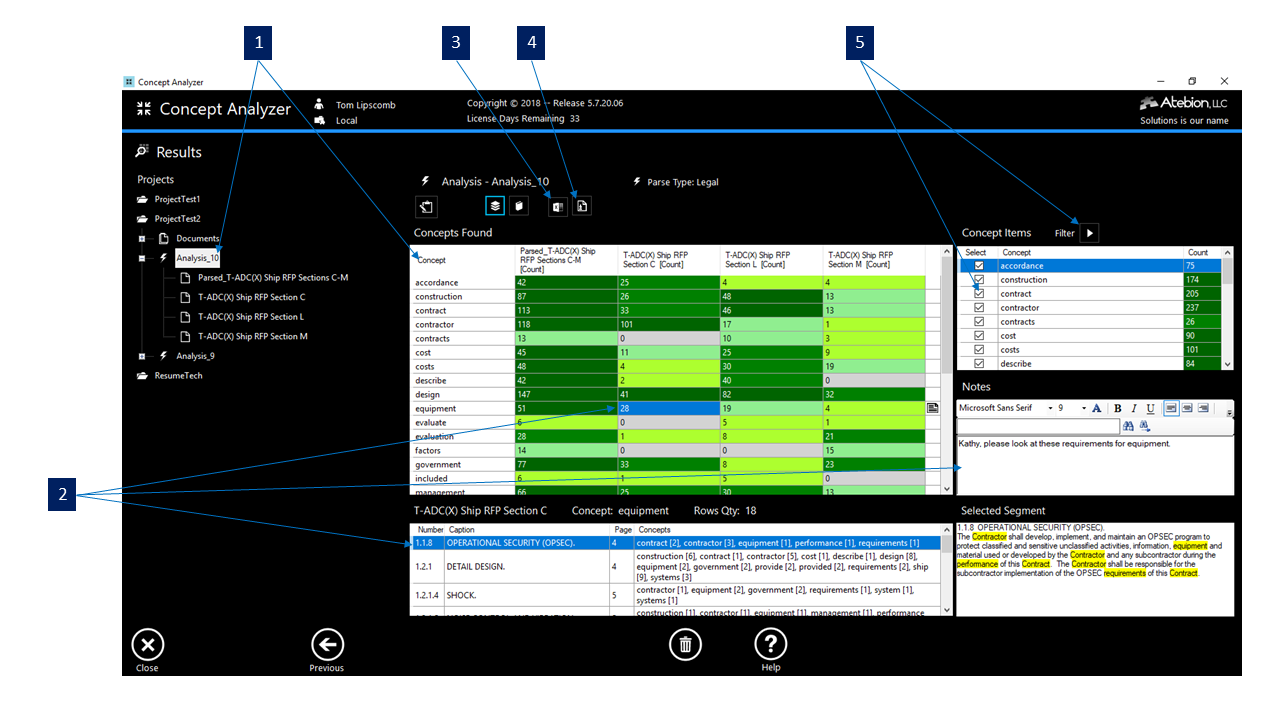
1. Select an Analysis – In the tree, select a Analysis under a Project and then click on the Concept button.
2. Segment/Paragraph Selection – A selected table cell displays a Document's associated parsed segment/paragraph and any annotated notes you have entered for the selected concept.
Notes are automatically saved.
3. Export Results to Excel – Click the Excel button to export the Concept Results to an Excel file.
Filtered results can be exported via Concept filter (5)
Your Notes are included in the export.
Value Colors are optional, the default is Yes per the Color checkbox on the Export window.
4. Exported Excel Files – Click the Exported button to open a previous exported Excel file or share with co-workers via Email (Outlook required).
5. Concept Filter – Check or uncheck desired Items and then click the Filter button.
Results Documents Dictionary Item/Term Comparisons
Use Case: Compare Resumes to quickly identify the person best suited for the position
Use Case: Gap Analysis between an RFP and Proposal
Results Documents Dictionary Item/Term Comparisons is a terms matrix of counts and weights for each document.
Weights are color coded by value range, providing visual assistance for recognizing higher and lower weight results.

1. Select an Analysis – In the tree, select a Analysis under a Project and then click on the Dictionary button.
2. Segment/Paragraph Selection – A selected table cell displays a Document's associated parsed segment/paragraph and any annotated notes you have entered for the selected concept.
Notes are automatically saved.
3. Export Results to Excel – Click the Excel button to export the Dictionary Results to an Excel file.
Filtered results can be exported via Dictionary Items/Terms filter (5)
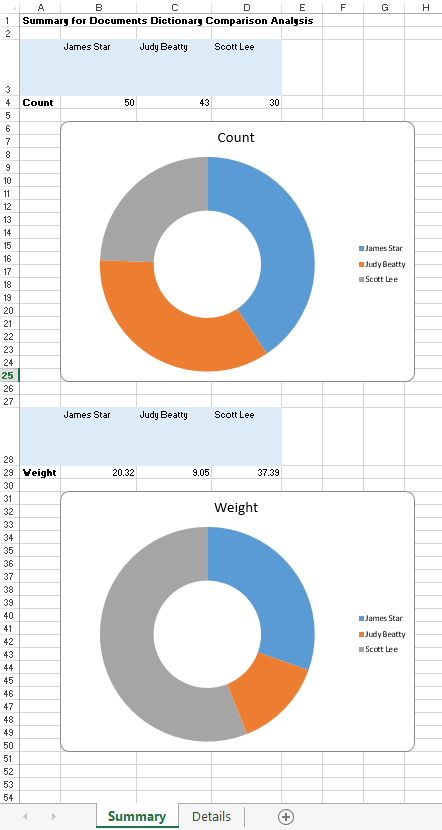
The Summary sheet displays a Count chart and a Weight chart.
Example Use Case - This report gives both skills Count and Weight values. In this example, Scott has the least skills but has the most important skill-set based on the weighted values set in the custom skills Dictionary. This will help you quickly identify the most qualified individual based on the desired abilities.
4. Exported Excel Files – Click the Exported button to open a previous exported Excel file or share with co-workers via Email (Outlook required).
5. Dictionary Items/Terms Filter – Check or uncheck desired Items and then click the Filter button.